A roof light can turn a dim room into the best space in the house. Daylight drops in from above, rooms feel larger, and everyday tasks become easier. Those gains only last if the installation is done properly. Many call-outs come down to the same avoidable issues: poor measurement, the wrong pitch, weak waterproofing, the wrong glass, or cold bridges around the frame. This guide walks through the most common RoofLight Installation Mistakes, explains why they happen, and shows how to avoid them. The aim is a calm, practical checklist for homeowners, builders, contractors, architects and interior designers simple to follow, strong enough to stand up on site.
A rooflight is a hole in the building envelope, so the detailing has to be right. If it isn’t, heat escapes in winter, rooms overheat in summer, and water finds its way to the weakest point. Bad detailing also shortens the life of seals, frames and internal finishes. You see it as stained plaster, swelling timber, or glass that mists at the edges.
Good Roof Light Installation does the opposite. It keeps the vapour control layer intact, protects the thermal line, sheds water cleanly, and holds the glass at a stable temperature. The difference shows up in comfort, energy bills and resale photos and it keeps warranties valid because manufacturers expect the basics to be in place.
read more: Best Rooflights for Small Spaces
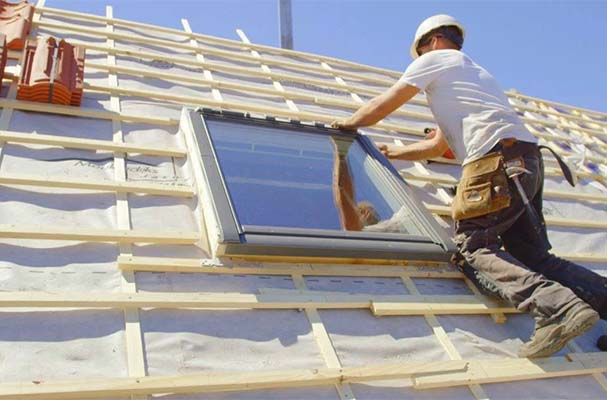
This is the fastest way to create headaches. People measure the visible ceiling hole and assume that dimension matches the roof light. It rarely does. Manufacturers quote a “structural opening” or “kerb external” size that includes clearances for packers, fixings and expansion. If you cut the opening too small, the frame gets forced in and the bite on the glass changes; too large and you end up building clumsy infills that leak air and look untidy.
The cure is simple. Measure the structural opening, not just the plastered reveal. Check the datasheet twice, including tolerances and upstand thickness. If you are replacing an old unit, confirm whether you’re measuring glass size, daylight size or frame size those three are not the same. On large panes, a cardboard template helps you prove fit before you lift anything to the roof. A few minutes of checking saves hours of trimming and sealing later.
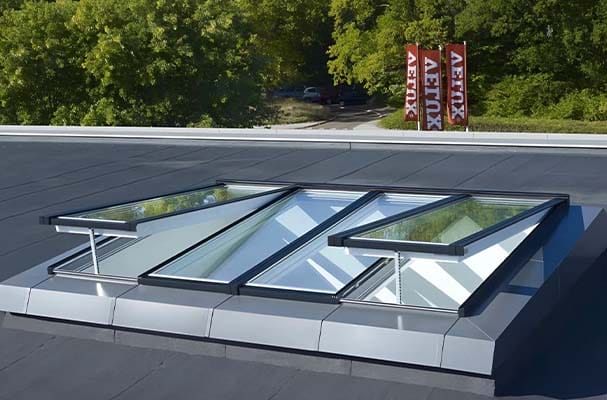
“Flat roof” does not mean flat glass. Most roof lights need a slight pitch so rainwater and grime run off instead of pooling. A fall of three to five degrees is common; many suppliers state the minimum on the datasheet. Fit a unit dead level and you invite standing water at the edges, which shortens the life of seals and can stain or spot the glass.
On pitched roofs, the frame must sit within the manufacturer’s pitch range and the flashing kit must match the tile or slate profile; the wrong combination lets wind-driven rain creep under laps. Upstand height matters as well. If the upstand sits too low, snow and standing water reach the glass edge; too high and the roof light looks like a box on a box. The right pitch and a clean drainage path are quiet details that keep the product doing its job for years.
Most leaks blamed on the “unit” are really flashing issues. A good flashing is a system: the roofing membrane or felt dresses onto the upstand; the roof light’s frame or kerb laps over that layer; and the external flashing kit sends water back onto the roof. Problems start when people mix brands, cut corners on laps, or guess at details around awkward corners.
Another common slip is burying the base of the kerb behind decking, planters or coping stones. That looks tidy on day one and traps water forever after. Keep a small service gap so air can dry the joint and the weep holes can work. Inside, connect the vapour control layer to the frame with proper tapes. If warm, moist air can track into the opening, you’ll see condensation and mould long before you see a drip. Good waterproofing is not about more sealant; it is about layers that overlap in the right order, with room for water to leave.
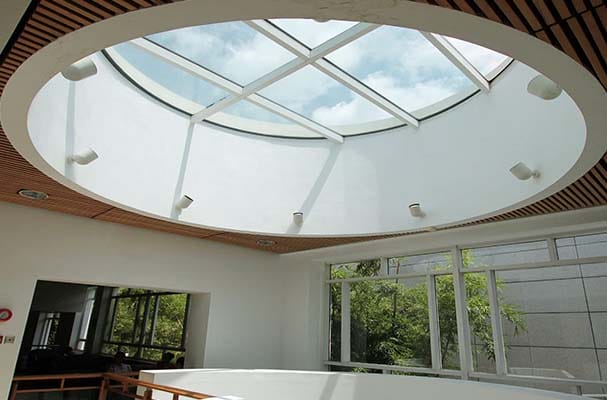
A modular rooflight system allows multiple glazed units to be linked together seamlessly, creating larger daylight areas with clean sightlines and consistent thermal performance.
Glass is not one thing. The wrong choice can make a lovely room uncomfortable. In a south- or west-facing kitchen, clear glass with a high solar factor can drive summer heat; in a north-facing bedroom, a cold inner pane can feel chilly on winter nights. Think about use and orientation. Double glazing with a low-E coating, argon gas and warm-edge spacers will suit many rooms.
Triple glazing lifts comfort again by keeping the inner pane closer to room temperature. Where summer heat is the problem, solar-control glass (for example a 70/35-type coating) reduces heat gain while keeping daylight levels high. For overhead safety and warmer interior surfaces, a laminated inner pane is a smart upgrade.
Frames matter too. A thermally broken aluminium frame keeps lines slim and reduces cold spots; timber or hybrid interiors feel warmer to the touch but need weather-resistant exteriors. For walk-on glass, treat it like structure: use toughened-laminated build-ups, slip-resistant finishes and supports designed for the actual loads.
Cold bridges undo expensive glass. If the upstand is uninsulated, or if the internal reveal is just plasterboard over timber, you will see cold edges and, on hard winter mornings, condensation. That moisture discolours paint and can creep into the build-up. The fix is not dramatic. Insulate the outside face of the upstand to the level the roofing system allows.
Line the internal reveals with rigid insulation and bring the plasterboard over it so the room “sees” a warm surface. Use airtight tapes to tie the vapour control layer to the frame all around, not just in the easy corners. Ask for warm-edge spacers in the glazed unit and check that the frame actually has a thermal break rather than a cosmetic trim. None of these details show up in a brochure photo, but they decide whether the Roof Light Installation feels snug on a frosty evening or not.
A durable result starts on paper. Choose the product for the task, not the other way round. If the room needs purge ventilation, specify an opener and plan the wiring before anyone cuts the roof. If the space overheats, pick a solar-control glass and a blind that people can reach. Confirm the size, the structural opening and the upstand detail with the supplier.
On site, protect edges and keep the channel or kerb clean as you work; one stray screw under a glass edge can start trouble months later. Set the pitch, check the diagonal measurements, and fix the frame square so the sash seals evenly. Dress membranes and flashings in the sequence the manufacturer draws, not in the order that seems quick at the time. Inside, complete the airtight tapes and insulated reveals before decoration. After handover, show the client how the rain sensor, blind or manual winder works, and leave a short care sheet: rinse the glass, keep weep holes open, don’t pressure-wash the seals, check the perimeter after the first heavy rain.
If you are replacing an older unit, take the chance to solve the original problem rather than copy it. A steady drip that returns every winter might be poor flashing, a low upstand, or a ponding issue on the roof; a misty cavity between panes means the glass unit is blown. If access needs scaffolding, consider batching work two roof lights replaced under one scaffold is often cheaper than two separate visits. Where in doubt, document what you see. Photos of the opening, the roof covering, the pitch, and the inside reveal help a specialist give you specific advice without guesswork.
Most Roof Light Installation Mistakes come from rushing the basics. Measure the right thing. Give the opening a slight pitch. Flash to a drawing, not a hunch. Pick glass and frames for the room you actually have. Keep the thermal line warm, the air line tight, and the drainage path clear. Do those few things and the roof light will feel effortless for years. If you want a second pair of eyes on a plan or a detail, share the room layout, roof build-up and a quick photo of the site conditions. We’ll suggest a buildable specification glass, frame, flashing and insulation that keeps the weather out, keeps heat where you want it, and makes the most of the daylight you’re paying for.
Send us your contact details and a specialist will get in touch with you.